
Editing can be a daunting prospect. The process of turning your rough first draft into a polished story you’re proud to share can be as tough to envision as that of turning a collection of sponges, fillings, and decorations into a three-tiered masterpiece. The key, in both cases, is to break the process down into manageable stages. With the cake, it is vital to create a solid structure on which to assemble your bake. Without it, the cake is likely to topple or collapse in on itself. The same can be said of a good story. This is why the structural edit should always be the first step in the editing process. Armed with a rested first draft, feedback from readers, and your own reading notes, it’s time to take the next step and assemble your bake.
What is a structural edit?
This is an edit where you fix the skeleton structure of your story in place. The order of scenes and chapters, the sequence and speed at which events unfold, and the ebb and flow of tension between key moments leading to the story’s climax. Character growth is also tied in with a story’s structure, as your characters will be reacting and evolving in sync with key events.
Where to start?
Start by going through your reader feedback or own notes and highlighting all the comments related to structure. You are looking for areas where the action is too slow or events unfold too quickly, where the order of events doesn’t work or character choices don’t make sense, or where key moments fall flat. Anywhere were you think you will need to add, delete, move, or rewrite a scene to fix it. Use these highlighted notes to create a to-do list. For each item on the list write down:
- The scene number or title
- What’s wrong with it
- Ideas for fixing it
Visualise Your Structure
Stepping back from your work, detaching yourself from the characters and events, and viewing your story with a critical eye is key to a successful edit. This is something I struggled with until I found a way to visualise the skeleton of my plot and structure. This involves identifying individual plots and sub-plots, tracking the progress of each one through a flow chart, and using the data from the chart to create a graph.
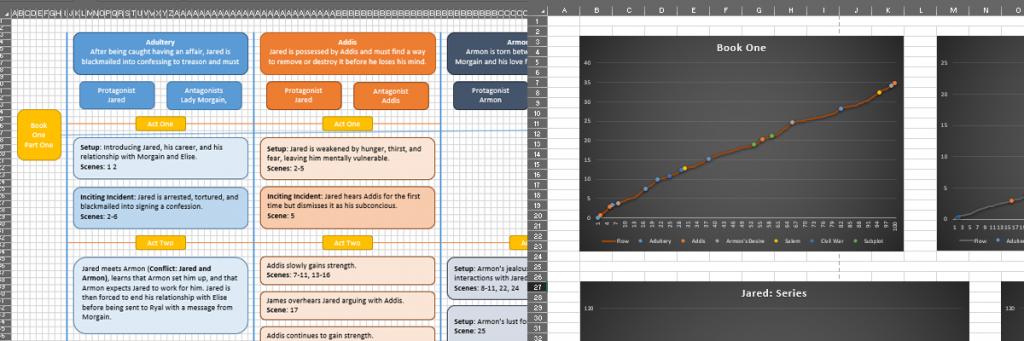
Though time consuming, I find this useful as it lets me ‘see’ the flow and tension in my book. I’ll explain how I created the chart and graphs in detail in another post, but the basic steps are:
- Identify each plot and sub-plot in your book. (The scene-by-scene list created in ‘Doing Your Own Alpha Read’ is useful here.) In excel (or equivalent) create columns related to these plots.
- For each scene, identify the plots involved and mark it on the appropriate column on the flow chart. (If a plot point covers multiple scenes, you can list these on a single entry. (see pic))
- Highlight key moments, inciting incidents, points of no return, and the climax for each plot with different colours and text.
- Create a chart with plots along the top,heading the columns and scene numbers down the side as rows.

- Record if the plot was moved forward in a scene (I used a Y for yes). Also note if it was a key moment, inciting incident (II), point of no return (PNR), or climax.
- Give each scene a rating based on the plots affected. I used the following scale: Y=0.1, Key=0.2, II=0.5, PNR=0.5, Climax=1
- Use this data to create a graph showing the flow and tension of your story. (A higher number=higher tension)
Analyse the Visuals
Once you have your chart and graph(s), you can use them to double check for any structural issues. Think of it as preparing a dowel before making the final cut. You’ve measured your bottom tier (checked your readers’ comments and your own notes), marked the supporting dowel (made the to-do list), but want to check the dowel against the cake to avoid cutting it too short. Your visuals will allow you to do this. Look for:
- Long gaps in a plot revealed by an empty section in the flow chart or flat section in a graph.
- Areas in the graph that are too stable. A long shallow section can indicate slow pacing, whereas a long steep section can indicate too much action, not allowing the reader (or characters) to breathe.
- Lack of rising tension as you approach important moments in the plot. The graph should get gradually steeper, culminating at the key moment, before tapering off.
- Take your story’s genre into account when doing this. Readers will expect different pacing and tension from different genres. For example, a piece of historical fiction may move along at a simmer before hitting a flash boil, whilst an action adventure will be a faster burn with infrequent moments of calm.
Wherever you notice areas like this, check it against your to-do list. If you already have the scenes marked down to fix, add a note saying what the graph shows. If you don’t, add them to your list as needing re-read to check for pacing/tension issues.
Back-up Your First Draft
Before starting the edit, there is one more step you must take. Make a back-up of your first draft. If you’re using Scrivener, do this by creating a snapshot of each scene before you work on it. If you’re using word or another word processor, use the ‘save as’ option to create a fresh copy of your document to work on. This way, if your edits don’t work, you will always have the original to fall back on.
Work Through Your List
With your to-do list in hand, it’s time to start the editing. Don’t let the length—or lack of length—of your list overwhelm you. Every story is different, which means every story will need a different amount of editing to get it to a stage you are happy with. For now, the key is to focus on one issue at a time.
When deciding which issue to tackle first, I strongly advise working through them in scene order, from the start of the story to the end. This way you won’t end up fixing a later scene only to have changes you make to an earlier one make those fixes irrelevant. You should also be aware of any impact your edits will have. Ask yourself:
- If you delete a scene, will any vital information/action be lost? Can you fit this in elsewhere in the story?
- If you change how a scene evolves, what impact will it have on the rest of the story? What other scenes need updated to reflect the change?
- If you change the order of some scenes, does it cause any continuity issues? Eg: will a character now be in two places at once, or will other scenes not make sense as the cause will happen after the effect?
- If you’re adding a scene, what adjustments do you need in later scenes to reflect the addition?
Whenever you identify a potential issue created by your edits, remember to record it on your to-do list so you can fix it as you progress.
Take your time as you work your way through your list. Remember that no change is final. If something doesn’t work you can always revert to the original via your back-up. And don’t sweat the small stuff at this point. The structural edit is all about ensuring your story has a solid skeleton. Shaping and decorating will come later.
Read Your Work Again
By the time you reach the end of your list, all the dowels should be cut and fitted in place, the sponges filled and stacked, and the cake boards positioned to keep the tiers in place. Congratulations, you now have something resembling a cake—or the skeleton of one, at least.
Before you move on, take a break from editing and read your story again. Check for any signs of structural weakness, spots where the story sags or the plot has cracks. Have your edits fixed all the issues you identified? Or have you accidentally created new ones? If your second read uncovers any structural problems, return to the beginning of this process and perform a second edit.
The number of structural edits you need to do will vary from project to project. For some, you will only need to do one, but for others you may need several before you’re happy with the final result. Don’t rush this stage of the editing. It’s better to resolve any major issues now than to spend hours shaping and decorating your cake only to cut it open and discover its raw in the centre.
Once You’re Happy
Once you’re happy with the structure of your story, set it to one side for a time. Work on another project to give your editing-head a break, binge watch some TV, or spend some time with your family. When you return to your current project, it’ll be time to carve it into shape by doing scene-by-scene edits.
Want to receive updates on new blog posts and a free copy of my short story The Glass Butterfly (8,000 words)? Sign up to my Bake a Book newsletter below.